How to Spot Rust, Bad Bodywork and Hidden Repairs in a Classic Car
Fresh paint can make a tired classic look expensive. Sound metal can make an ugly one worth saving. The key is learning what the body is really telling you — where corrosion matters, what repairs are acceptable, and when the shiny surface is hiding something much more serious.
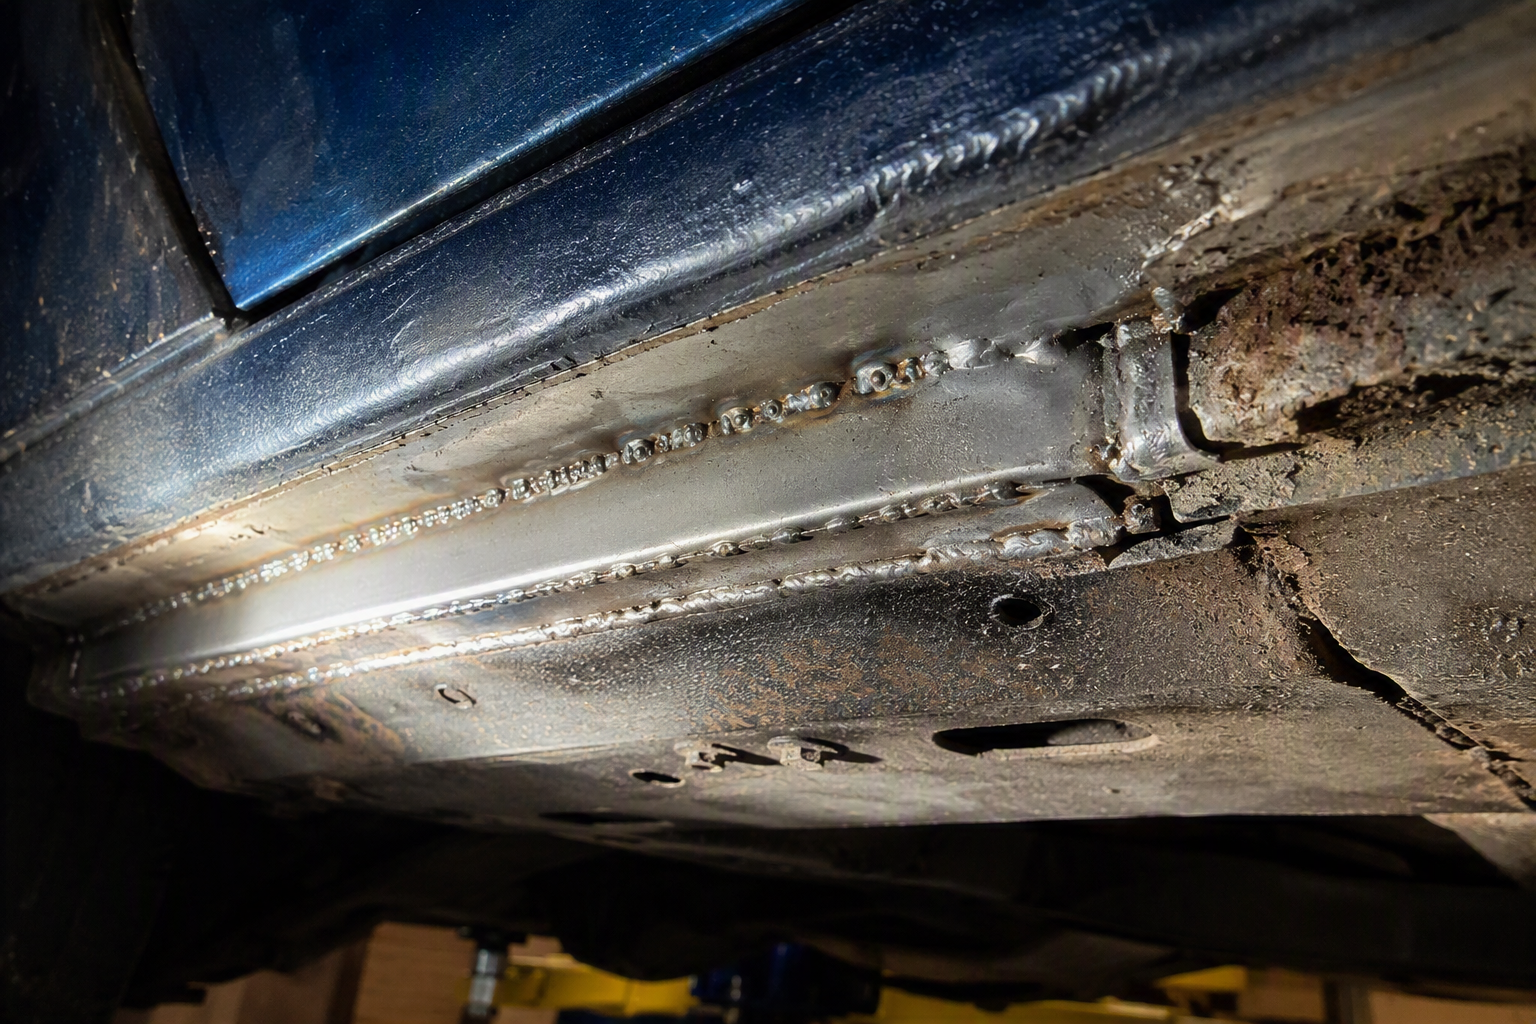
Introduction
Classic cars can hide enormous amounts of money under a few millimetres of paint. A faded car may look tired but have strong original metal. A freshly restored car may look magnificent but contain extensive filler, old corrosion, crude patches or badly repaired structural work. And a perfectly legitimate repair can look suspicious simply because it is not original.
That is why body condition should not be reduced to a question such as:
“Does it have rust?”
or:
“Has it been repaired?”
Almost every old car has been repaired somewhere. The real questions are:
Where is the problem?
What structure lies behind it?
How extensive is it?
Was the damaged metal removed properly?
Was the repair strong, correctly shaped and protected afterwards?
A paint bubble on a door skin and corrosion around a suspension mounting point may both be called “rust”. They are not remotely the same problem.
The objective of this guide is therefore not to teach you how to become a body technician. It is to teach you how to recognise which visible clues are mostly cosmetic, which deserve further investigation, and which can fundamentally change the economics or safety of the car.
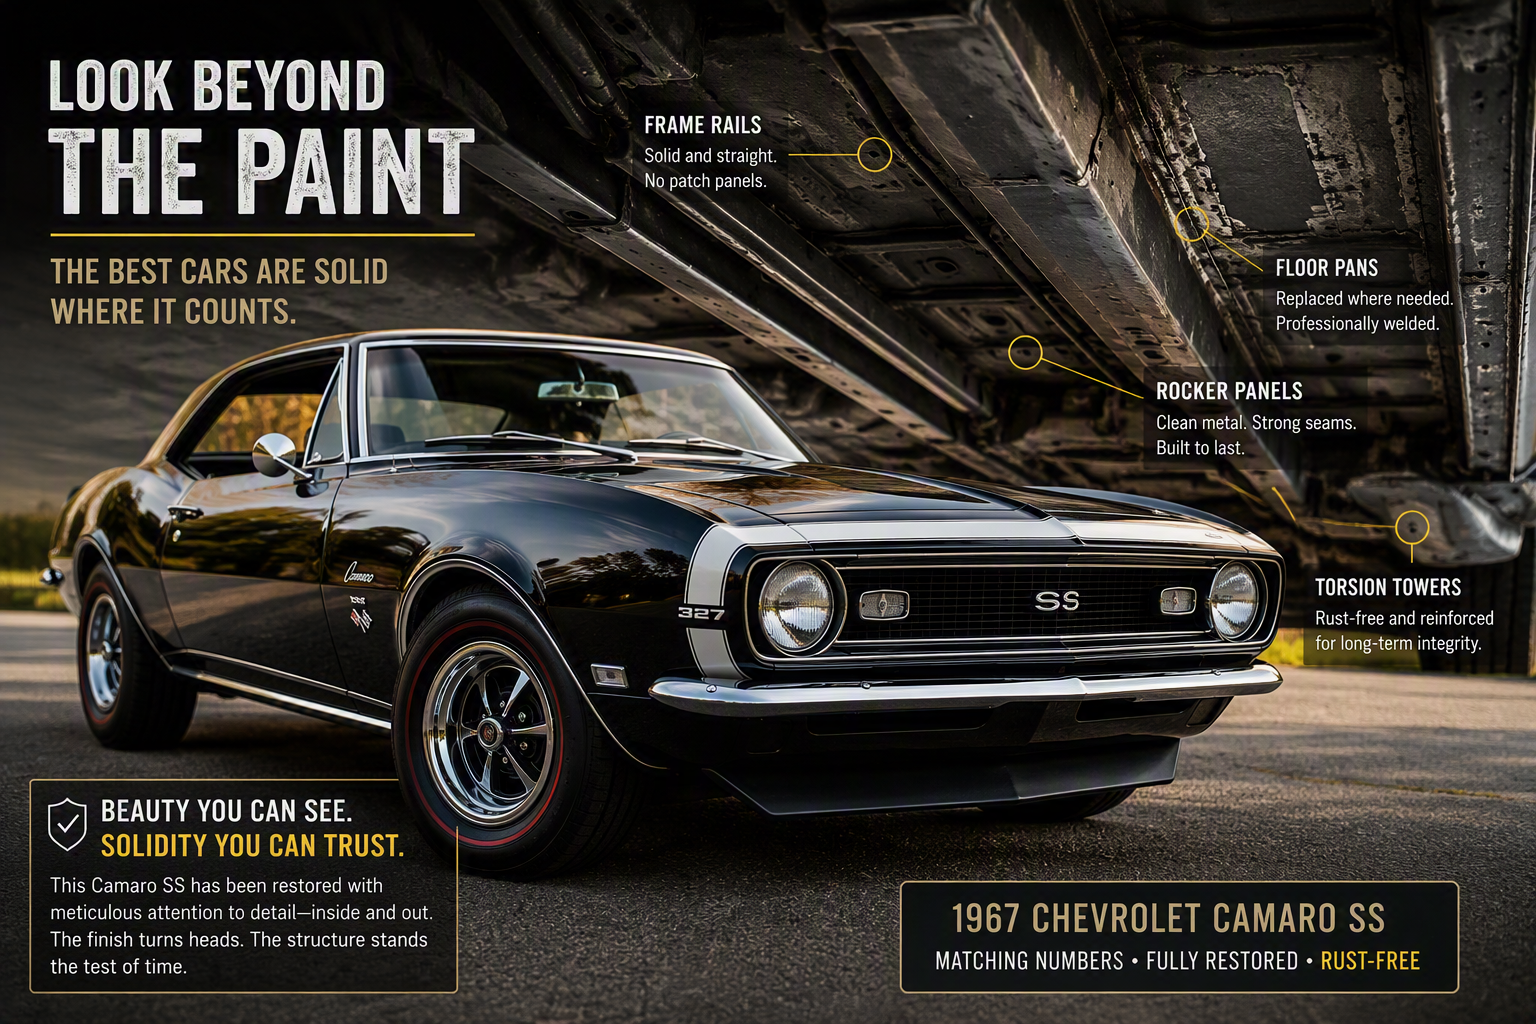
Never let the quality of the paint answer a question that only inspection of the metal can answer.
1. Rust is not one condition
The word “rust” is too broad to be useful by itself. A buyer should separate at least five different situations.
| Type | What it usually means | Why it matters |
|Surface corrosion | Oxidation on otherwise sound metal | Often manageable if the metal has not lost meaningful thickness |
|Cosmetic corrosion | Rust affecting outer panels or visible surfaces | Can be expensive cosmetically but may not affect structure |
|Seam corrosion | Rust developing between joined or folded panels | Can spread much further than the visible edge suggests |
|Perforation | Rust has eaten through the full thickness of the panel | More serious, especially in structural areas |
|Structural corrosion | Loss of metal in load-bearing or safety-critical structure | Can affect strength, alignment, suspension mounting and restoration viability |
Location matters more than colour. A large rusty patch in a detachable front wing may be inconvenient. A small hole in a chassis rail beside a suspension mount can be much more serious. That is why the correct question is: “What does this piece of metal actually do?”
Body-on-frame cars. On a separate-chassis car, prioritise:
- main frame rails;
- crossmembers;
- outriggers;
- body mounts;
- spring hangers;
- suspension pickup points;
- steering-box or rack mounts;
- engine and transmission mount areas;
- rear axle locating points.
A beautiful body does not compensate for a weakened frame.
Monocoque or unibody cars. On a unibody, apparently ordinary sheet-metal panels may form part of the structure. Pay particular attention to:
- inner and outer sills/rockers;
- floors around reinforcement sections;
- pillars;
- chassis legs;
- subframe mounts;
- strut or shock towers;
- torque boxes;
- suspension pickup points;
- bulkheads/firewalls;
- rear spring or trailing-arm mounts.
The floor in one car may be little more than a floor. The floor in another may contribute directly to the strength of the shell.
CLASSICS R US INSIGHT: Do not ask only how much rust there is. Ask where it is, what that structure carries, and how much sound metal remains around it.
2. Hidden rust often starts where you cannot see it
Many of the most expensive corrosion problems develop from the inside out. Water and debris collect in:
- boxed sections;
- overlapping seams;
- window apertures;
- rocker/sill structures;
- chassis rails;
- battery areas;
- wheel housings;
- boot/trunk gutters;
- lower door sections;
- behind seals and trim.
By the time the outside shows a bubble, the corrosion behind it may be minor. Or it may already be extensive. That is why a visible bubble should be treated as a question, not a diagnosis.
Ask:
- what lies behind this panel?
- is the rear face accessible?
- is there a seam behind it?
- is this a known rust trap on the model?
- is the corresponding area on the other side in similar condition?
Learn the rust map of the exact car. A generic inspection checklist is useful. A model-specific rust map is better. Before inspecting a car, search for the known structural and moisture traps of that exact generation.
Examples:
Early Ford Mustang: floors, cowl area, frame rails, lower doors, trunk areas and window surrounds deserve attention.
Air-cooled Porsche 911: inner/outer sill structures and concealed kidney-bowl areas can retain moisture and debris.
Jaguar E-Type: sills, floors, rear structural areas, bonnet structure and front frames can become economically decisive.
Datsun S30 Z: rails, floors, battery-tray area and lower rear doglegs are common places to inspect carefully.
Mercedes W113 Pagoda: cavities and structural body sections deserve specialist scrutiny.
BMW E9: sills, floors and rear shock-tower structures can hide expensive corrosion.
C2/C3 Corvette: the exterior may be fibreglass, but the hidden steel birdcage and windscreen-frame structure can rust badly.
That last example is important. A fibreglass body does not mean the car has no rust risk. It simply means the rust may be somewhere else.
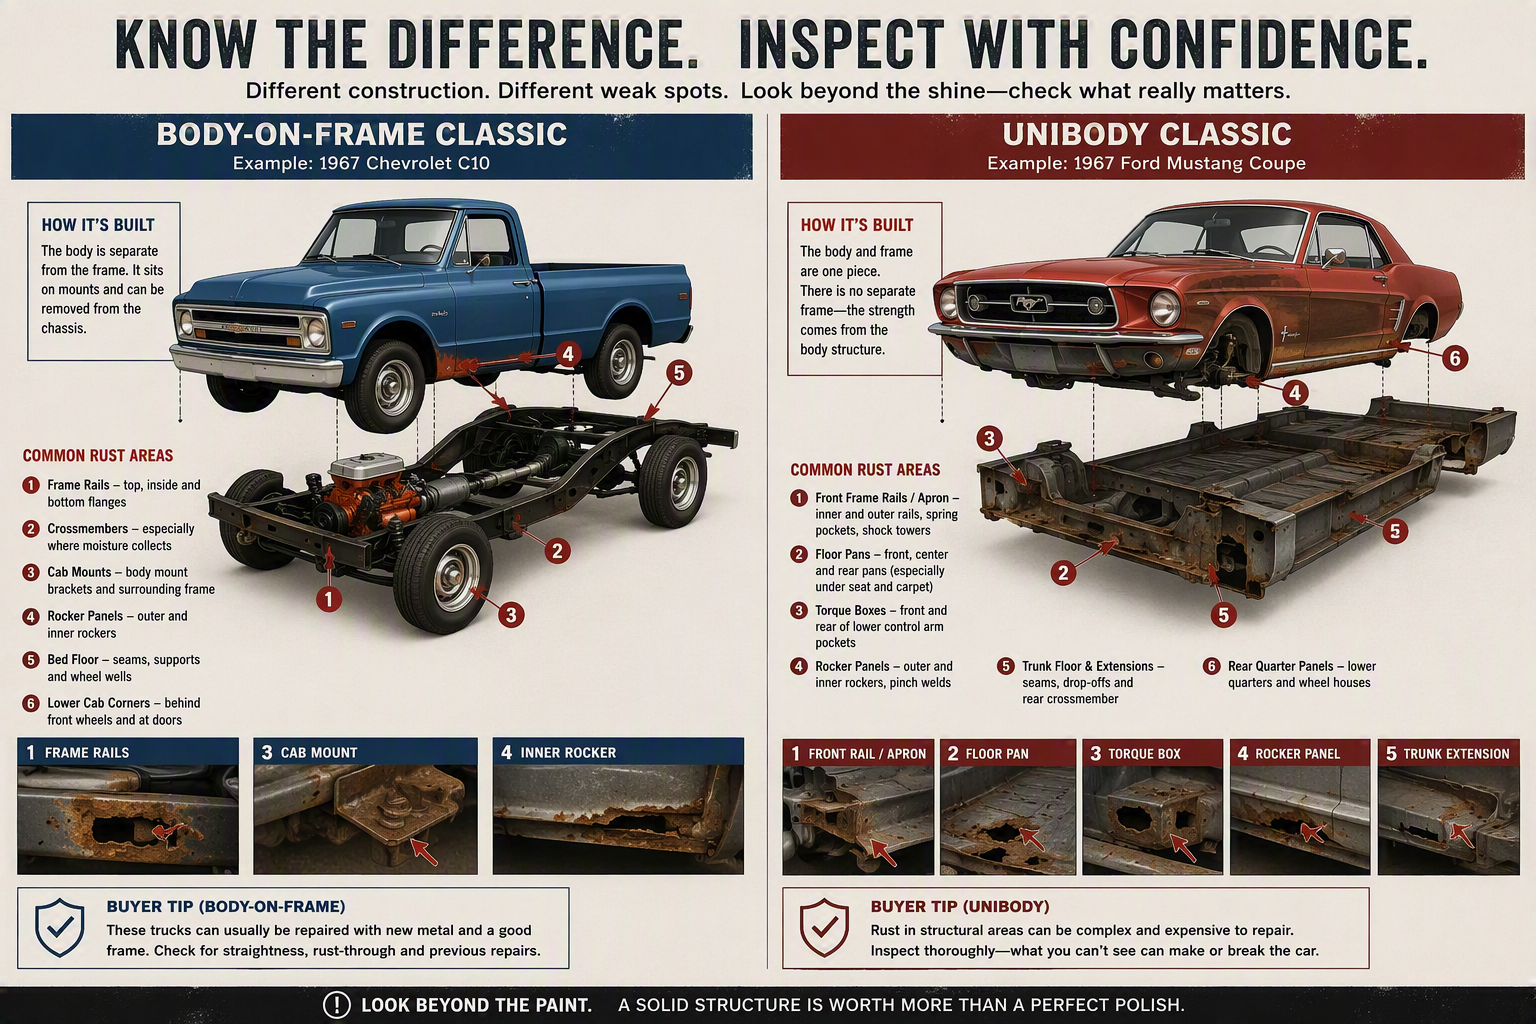
The seriousness of corrosion depends on the load path, not the size of the stain.
3. Paint can reveal previous work but it cannot tell you why it was done
Paint is useful evidence because refinishing often leaves clues. Look for:
- colour mismatch between adjoining panels;
- different gloss levels;
- different paint texture;
- overspray;
- masking lines;
- paint on rubbers or fasteners;
- sanding scratches;
- orange peel;
- dry spray;
- bubbles or blistering;
- cracking or checking;
- sinkage;
- wavy reflections;
- unusually heavy coating build;
- different finish inside door jambs or the engine bay.
But interpretation matters.
Colour or gloss mismatch: This usually tells you that the panel was painted at a different time. It does not tell you why. The reason may have been:
- cosmetic damage;
- stone chips;
- rust repair;
- panel replacement;
- collision damage;
- or simply an old repaint that faded differently.
Ask: “Which panels were painted, when and why?”
Orange peel: Orange peel is a paint-application characteristic. It does not prove filler or accident damage. Some factory finishes had visible texture.
Overspray and masking lines: These usually show that refinishing occurred without complete disassembly. That can tell you something about the quality or scope of the work. It still does not establish what happened underneath.
Wavy reflections: Waves can indicate:
- panel distortion;
- filler shaping;
- poor metal finishing;
- replacement-panel fit;
- or an imperfect original pressing.
Again, a clue is not a verdict.
Bubbling: Paint bubbling can be caused by corrosion beneath the surface. It can also be caused by coating failure, moisture or application problems. The useful question is not: “Is that rust?” It is: “Can we inspect what is behind that area?”
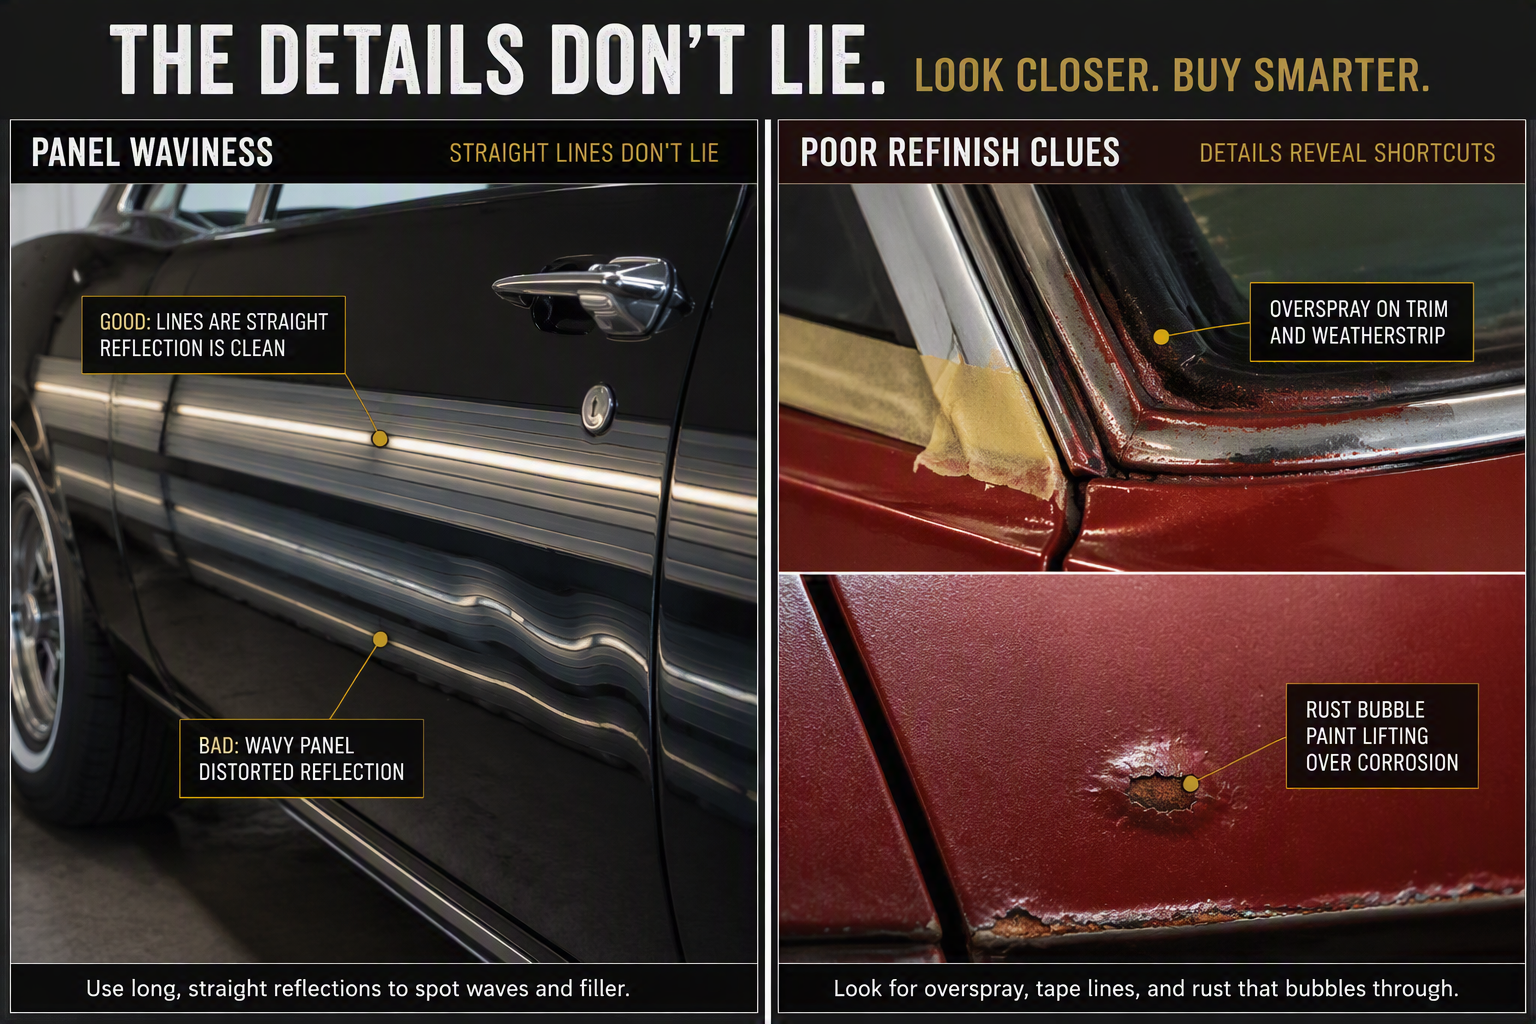
Paint defects tell you where to investigate. They do not automatically tell you what is underneath.
4. Panel gaps are cumulative evidence
Classic-car buyers sometimes become obsessed with panel gaps. That is understandable. But poor gaps do not automatically prove structural damage. Older cars may have:
- inconsistent factory tolerances;
- hand-finished bodywork;
- worn hinges;
- aftermarket panels;
- previous adjustment;
- old seals affecting fit;
- imperfect restoration work.
A single poor door gap may be nothing more than hinge wear. The more useful approach is to look for patterns.
Ask:
- Are the left and right sides broadly symmetrical?
- Does the wheel sit in the same position within each arch?
- Is a door gap tight at one corner and wide at another?
- Does the bonnet align with both the cowl and the fenders?
- Is the boot/trunk opening square?
- Are bumper mounts or headlamp apertures displaced?
- Are there repaired inner panels behind the misalignment?
Four possible explanations: A poor gap may result from:
Factory imperfection: Especially common on older, low-volume or hand-finished vehicles.
Adjustment issue: A hinge, striker or panel position may simply need correction.
Replacement-panel fit: Reproduction panels can be dimensionally imperfect even when the structure underneath is sound.
Structural distortion: This becomes more likely when several geometrically related areas disagree at the same time.
For example: A door does not fit. The wheel also sits too far back in the arch. The inner sill has been repaired. The front rail has visible welding. At that point, the evidence is no longer about one bad gap. It is about body geometry.
CLASSICS R US INSIGHT: One poor gap can be adjustment. Several related gaps, wheel-position differences and repaired inner structure may justify proper body or chassis measurement.
5. Body filler is not automatically bad
“Does it have filler?” is often the wrong question. Professional body repair frequently uses filler as a finishing material. The distinction is what the filler is being asked to do.
Reasonable use: A thin finishing skim over properly repaired metal can be perfectly normal. It may be used to:
- refine a welded repair;
- remove minor low spots;
- finish a hand-shaped panel;
- correct small surface imperfections.
More concerning use: Filler becomes more questionable when:
- it covers a very large area;
- thickness changes abruptly;
- it is used around badly repaired seams;
- cracking suggests movement underneath;
- the rear of the panel cannot be inspected;
- it is being used to shape what should have been metal.
Unacceptable use: Filler should not substitute for missing structural metal. It should not:
- bridge rust holes;
- recreate a structural sill edge;
- replace reinforcement;
- cover untreated corrosion;
- carry load.
How can filler be detected?
| Method | What it may show | Limitation |
| Magnet | Reduced attraction may indicate non-metallic material over steel | Does not work usefully on aluminium/fibreglass and can mislead on curved/thick painted surfaces |
| Paint-depth gauge | Large changes in coating build may indicate repaint or filler | Measures coating build, not “good/bad repair” |
| Reflected light | Waves or contour changes | Good workmanship can still look perfect |
| Backside inspection | Welds, patches and repair edges | Not every area is accessible |
| Borescope | Internal cavity condition | Limited field of view; does not prove weld quality |
| Tapping by a professional | Thick filler can sound different | Highly subjective and easy to misuse |
Do not turn the inspection into an internet trick involving magnets and guesswork. The strongest evidence is usually a combination of: paint pattern + backside evidence + restoration records + physical inspection.
6. Paint-depth meters are useful but they are not lie detectors
A paint-depth meter can be extremely useful on the right substrate. It can help identify:
- repainted panels;
- blend areas;
- unusually high coating build;
- patterns consistent with filler;
- one panel behaving differently from the rest of the car.
But classic cars are difficult because they may contain:
- factory paint;
- one or more historic repaints;
- primer surfacer;
- local repairs;
- filler;
- hand-finished panels;
- mixed materials.
The correct method is therefore comparative. Take multiple readings across a panel. Compare similar areas left-to-right. Look for abrupt changes. Correlate readings with visual evidence. Do not rely on one number. And do not publish or believe a universal rule such as: “Anything over X microns means filler.” That is too simplistic for an old car.
Substrate matters: A magnetic gauge intended for steel will not tell you much about:
- aluminium;
- fibreglass;
- composite panels.
Different technologies are required. That makes the instrument only as useful as the person interpreting it. A high reading should mean: “Investigate why.” Not: “Bad car.”
7. Welding and metal repair should restore function, not just appearance
Visible welding can frighten buyers. But a repaired classic is not automatically a poor classic. The important question is whether the repair restored:
- sound metal;
- original geometry;
- required reinforcement;
- load path;
- drainage;
- corrosion protection.
Good signs: Look for:
- damaged metal removed back to sound material;
- repair sections shaped to match the original structure;
- welds positioned logically;
- reinforcements preserved or recreated;
- drain holes retained;
- reverse surfaces protected;
- seams sealed correctly;
- no obvious distortion.
Concerning signs: Look for:
- patches welded over rusty metal;
- “patch over patch” repairs;
- flat plates covering complex structural shapes;
- burn-through;
- large blobs of weld;
- obvious pinholes;
- missing reinforcements;
- deleted drain holes;
- excessive grinding;
- thick seam sealer hiding the joint;
- visible corrosion continuing beyond the repair.
Do not judge weld quality only by beauty: Beautiful welds can still be structurally wrong. Ugly-looking welds can sometimes be perfectly strong. Older cars may also have factory welding that would look crude beside a modern restoration. The relevant question is: Does the repair make engineering sense?
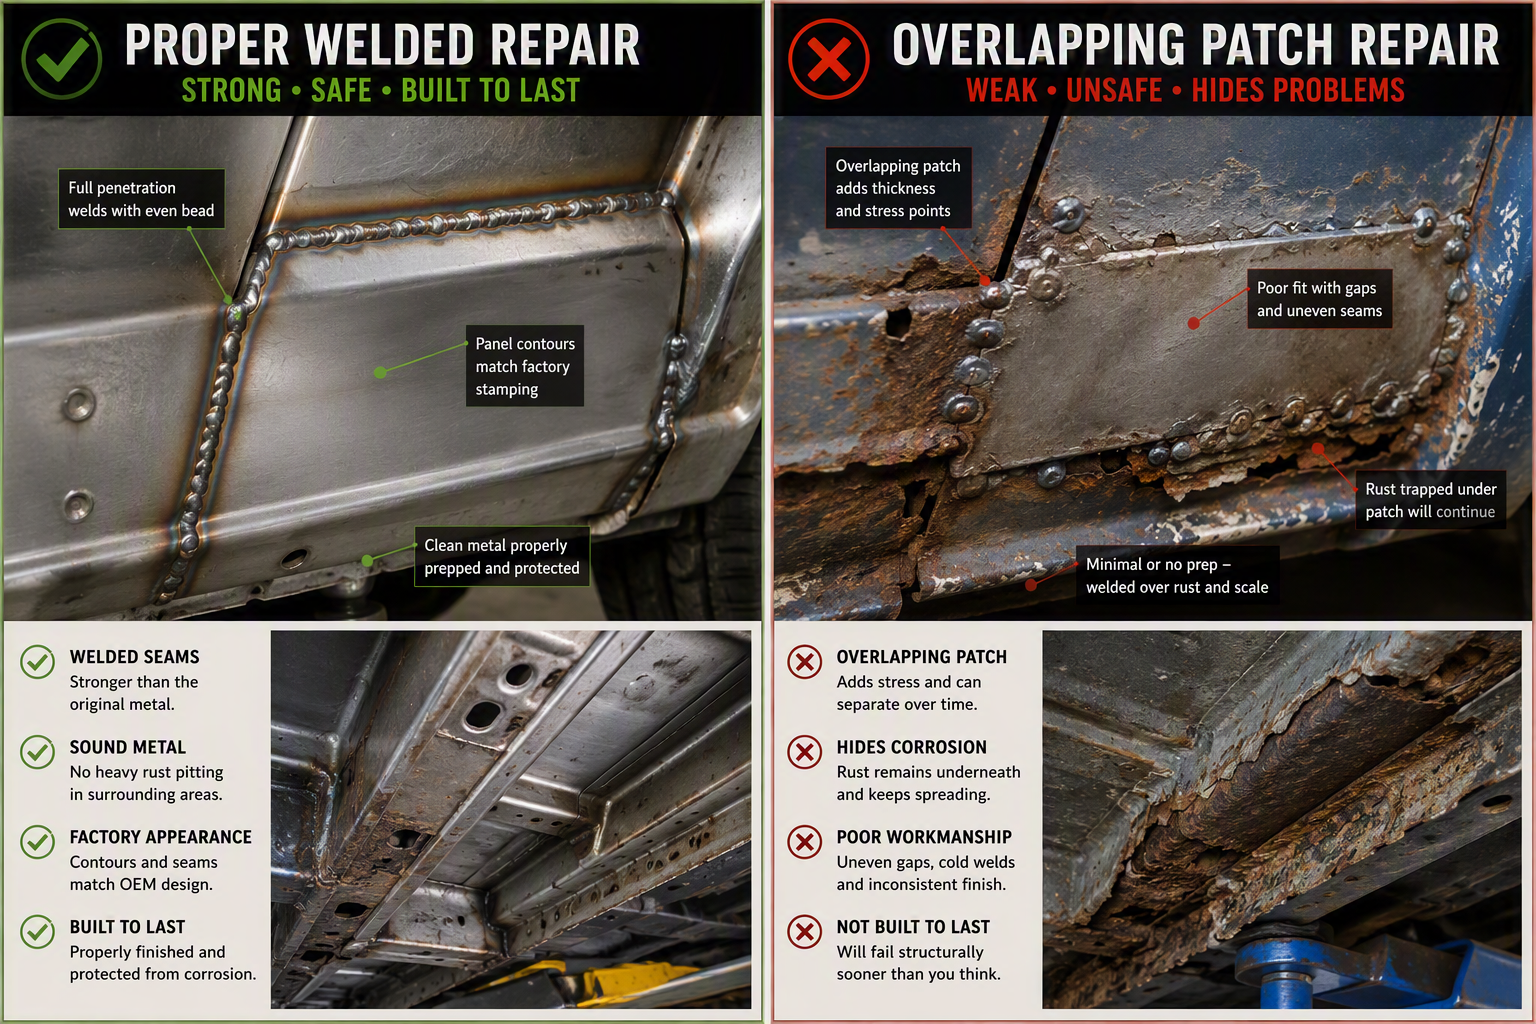
The repair should restore the structure, not simply hide the hole.
8. Fresh underseal is not automatically suspicious
Fresh black underseal often scares buyers because it can hide rust. That fear is understandable. But underseal, seam sealer and cavity wax are also legitimate corrosion-protection materials. A competent repair may require them. So the correct response to fresh coating is not: “They are hiding something.” It is: Show me what was underneath before it was coated.”
Ask for the sequence: The best evidence looks like this:
1. Original condition.
2. Paint/underseal removed.
3. Corrosion exposed.
4. Damaged metal cut away.
5. Replacement metal fitted.
6. Welds visible before filler or sealer.
7. Primer/corrosion protection.
8. Seam sealer/underseal/cavity wax.
9. Final finish.
The most valuable photographs are often the ugliest ones. The finished painted underside tells you the least about how the repair was achieved.
More concerning situations: Fresh underseal deserves extra investigation when:
- it has been applied immediately before sale;
- it is unusually thick;
- welds and seams disappear beneath it;
- no restoration photographs exist;
- rust scale appears trapped underneath;
- visible patches continue beyond the coating.
Again, the coating is not the problem. The missing history may be.
CLASSICS R US INSIGHT: Fresh underseal should trigger a request for earlier photographs, not an accusation. Good repairs need corrosion protection too.
9. Accident repair is not automatically a reason to reject a classic
A 40-, 50- or 60-year-old vehicle may have had collision repair. That alone does not make it a bad car. The real issue is: Was the structure returned to the correct shape and strength?
Possible clues include:
- non-factory welds concentrated in one corner;
- repaired or crushed rail ends;
- wrinkled inner wings;
- distorted radiator support;
- different seam sealer left-to-right;
- creased floors;
- misaligned suspension mounts;
- one wheel sitting differently in the arch;
- overspray in one structural area;
- poor glass fit after aperture repair;
- bent or spaced bumper brackets.
One clue rarely proves anything. A coherent pattern matters.
Restoration panel replacement is different; Classic restorations often involve replacing:
- floors;
- quarters;
- wings/fenders;
- sills;
- boot/trunk floors.
That does not mean the car was crashed. A rusty quarter panel and an impact-damaged quarter panel may both eventually be replaced. So instead of asking: “Has this panel ever been replaced?” ask: “Why was it replaced, what was underneath, and was the structure restored correctly?”
10. Fibreglass and aluminium classics require different thinking
Fibreglass-bodied cars: On a fibreglass Corvette, replica or other composite-bodied classic, look for:
- stress cracks;
- spider cracking;
- crazing;
- waviness;
- delamination;
- poor backside repairs;
- print-through from reinforcement;
- old collision repair;
- filler over damaged composite.
A magnet tells you nothing useful about a fibreglass panel. And remember: The body may not rust. The structure underneath may. The Corvette birdcage is the classic example.
Aluminium-bodied cars: Aluminium changes both corrosion and repair. Look for:
- oxidation under paint;
- pitting;
- galvanic corrosion where aluminium meets steel;
- stretched or distorted panels;
- cracks around old repairs;
- large filler areas;
- poor mixed-metal isolation.
A repair that would be routine on a steel panel may require very different skill on aluminium. For valuable aluminium-bodied cars, a marque or specialist body shop is usually more useful than a generic inspection.
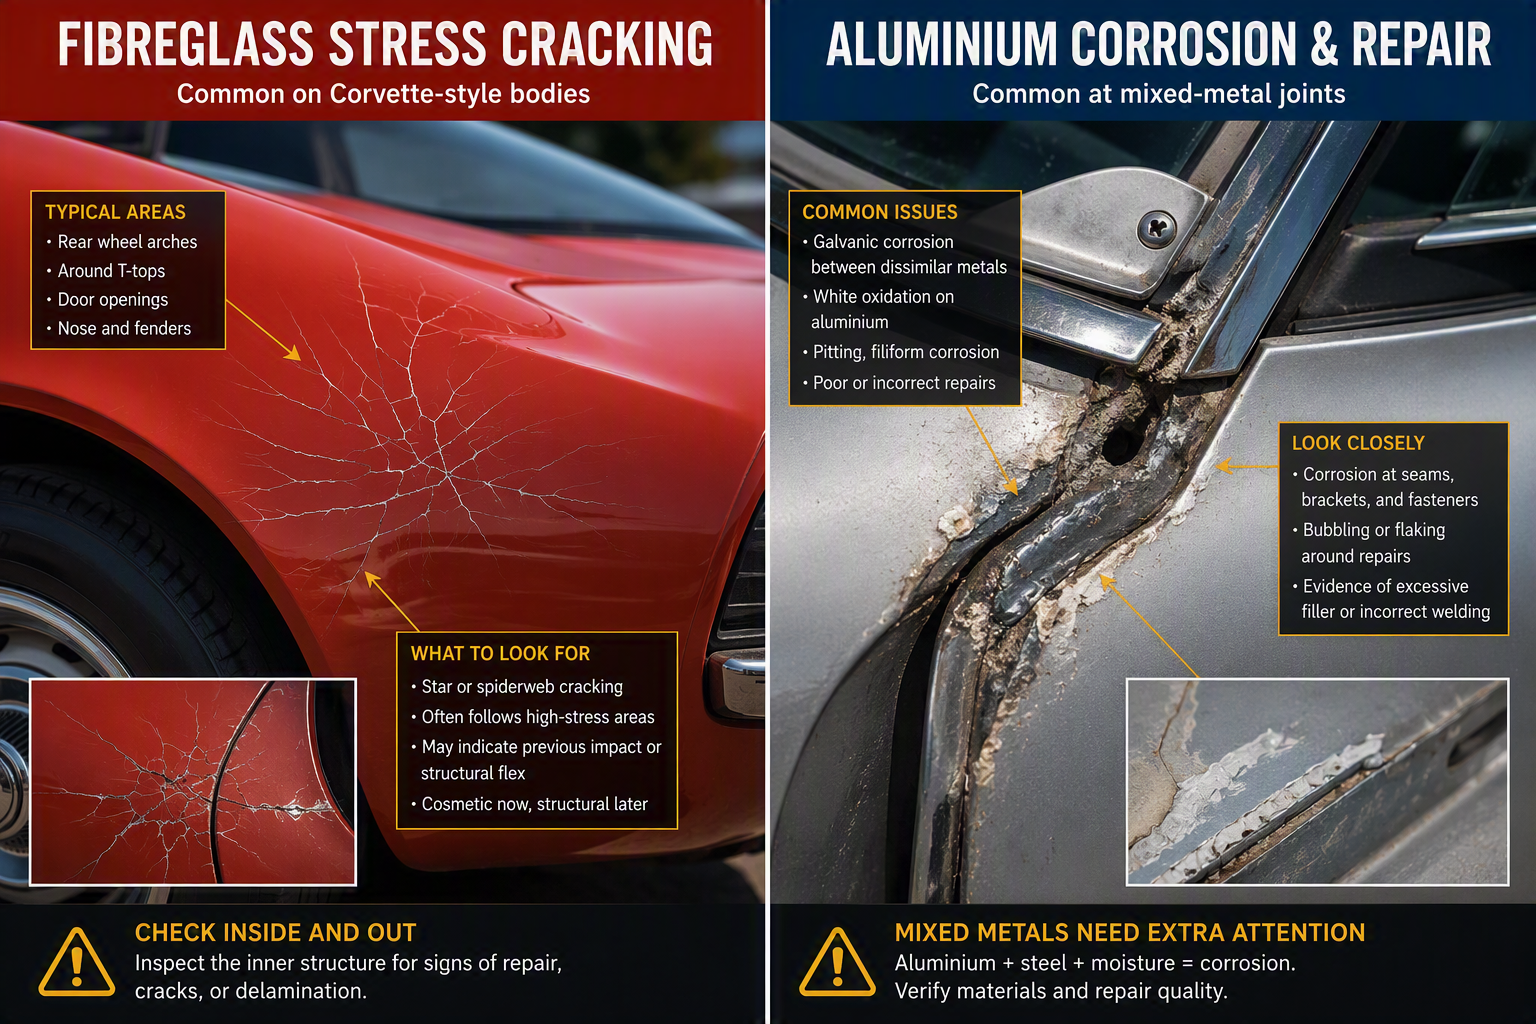
Different materials fail differently. The inspection method has to match the construction.
11. Door shuts, jambs and hidden areas often tell the truth
Some of the most useful evidence sits away from the polished exterior. Inspect:
- door jambs;
- hinge pillars;
- weatherstrip channels;
- window apertures;
- boot/trunk gutters;
- spare-wheel wells;
- battery trays;
- firewall seams;
- inner wings;
- underside of carpets where permitted;
- inside quarter panels where existing access allows.
Why? Because these areas may reveal:
- old paint beneath a fresh exterior;
- overspray;
- original seams;
- repaired seams;
- trapped water;
- corrosion;
- patch edges;
- non-factory welding;
- poor repaint preparation.
Water ingress deserves attention: Look for:
- damp carpets;
- mildew;
- staining;
- rust around seat mounts;
- discoloured sound deadening;
- water marks;
- moisture in the boot;
- corrosion around glass seals.
Then ask: “Where did the water enter, where did it sit, and what structure is beneath it?”. Water rarely respects the visible edge of a stain.
12. A lift inspection changes everything
Standing beside a classic tells you a great deal. A lift tells you something different.
From ground level: You can assess:
- paint;
- reflections;
- gaps;
- stance;
- trim;
- visible bubbling;
- door operation.
Kneeling with a light: You may see:
- rocker seams;
- lower quarters;
- wheel arches;
- visible floor edges;
- rail ends.
On a lift: You can properly inspect:
- floors;
- chassis rails;
- crossmembers;
- structural mounts;
- welded repairs;
- underseal;
- suspension attachment points;
- drain holes;
- underside corrosion.
With limited authorised access: Where the seller permits it, lifting removable mats or using a borescope through existing openings may reveal:
- hidden floor rust;
- internal sill condition;
- cavity wax;
- flakes of scale;
- backside welds.
But there is a boundary. A normal PPI is not a restoration teardown. Do not expect a seller to remove bonded trim, glass or major interior pieces simply because you are considering buying the car. And do not perform destructive testing on somebody else’s classic.
A practical body-condition triage: A simple four-level system can help.
| Level | Typical condition | Buyer response |
| 1 — Cosmetic | Chips, faded paint, minor surface oxidation, old checking, trim issues | Price normally and monitor |
| 2 — Repairable bodywork | Local panel rust, moderate filler, previous non-structural repair, panel-fit issues | Clarify repair history and budget realistic bodywork |
| 3 — Significant restoration | Sills, floors, multiple welded repairs, window-aperture rust, widespread corrosion | Specialist body inspection; restoration economics become central |
| 4 — Structural / pause | Frame rails, suspension mounts, pillars, major distortion, severe patching | Pause until independently measured and assessed |
“Pause” does not mean the car is automatically worthless. It means the uncertainty is too important to ignore. A properly reconstructed sill may be completely acceptable. An original but dangerously weakened sill is not automatically better simply because nobody has repaired it.
A practical photo → question → inspection framework
| What you see | What to ask | What should resolve it |
| Fresh black underseal | “Do you have photos before coating?” | Lift inspection of rails, floors and seams |
| Bubble on lower quarter | “Was this area repaired before?” | Rear-side inspection and local paint/body assessment |
| Poor door gap | “Hinge issue or body repair?” | Hinge check, aperture inspection and symmetry comparison |
| Wavy quarter panel | “Has this panel been filled or replaced?” | Reflections, gauge pattern and backside inspection |
| Overspray | “Which panels were refinished and why?” | Trace boundaries through jambs and inner panels |
| Fresh seam sealer | “Was this panel replaced?” | Compare with opposite side and restoration records |
| Visible floor patch | “Was old metal cut out?” | Inspect both sides of repair |
| Window-aperture rust | “Has the glass ever been removed?” | Aperture and water-ingress inspection |
| Sagging door | “Hinge wear or pillar/sill problem?” | Hinge play and structural inspection |
| One wheel sits differently | “Are wheelbase and mounts symmetrical?” | Alignment/body measurement |
| Repaired chassis rail | “Rust, collision or modification?” | Structural inspection and measurement |
| Fibreglass crack | “Paint crack or substrate damage?” | Backside composite inspection |
This is much more useful than merely asking whether the car “looks good”.
A practical bodywork checklist: Before buying a classic where body condition matters, ask:
- Have I identified the model’s known rust zones?
- Are the main structural areas visible?
- Have I seen the car on a lift?
- Are frame rails or unibody structural sections sound?
- Is there corrosion around suspension or steering mounts?
- Are rocker/sill structures sound?
- Are there patches over patches?
- Do repaired panels appear to have been cut back to sound metal?
- Are drain holes still present?
- Do welds and reinforcements make structural sense?
- Is the backside of major repairs protected?
- Are panel gaps broadly consistent with the car’s construction and age?
- Does one wheel sit differently within its arch?
- Are there signs of water ingress?
- Is fresh underseal supported by earlier photographs?
- Does paint-depth variation have a plausible explanation?
- Is filler being used to finish metal or substitute for it?
- Are hidden areas such as jambs, gutters and spare-wheel wells consistent with the exterior story?
- If the car is fibreglass, have I inspected the steel structure beneath it?
- If the car is aluminium, has someone familiar with aluminium repair assessed it?
- Do restoration photographs show the metal before it disappeared beneath filler, primer and paint?
- What important part of the body still remains unseen?
The last question matters most.
Conclusion
Beautiful paint is emotionally powerful. That is exactly why it can distract buyers from the structure underneath. The strongest classic-car purchase is not necessarily the car with the deepest shine. It is the car whose body condition you understand.
A faded car with sound, visible metal can be easier to evaluate than a freshly painted car with no history. A repaired car can be completely acceptable if the repair restored the original strength, geometry and corrosion protection. A car with filler can be perfectly legitimate if the filler is finishing sound metal rather than replacing it. Fresh seam sealer and underseal can be signs of good restoration rather than concealment. And a small rust bubble can be trivial or the first visible clue to a much larger hidden problem.
The buyer’s job is therefore not to fear every repair. It is to distinguish:
cosmetic from structural;
evidence from assumption;
proper repair from concealment;
and expensive uncertainty from a defect that can actually be priced.
CLASSICS R US INSIGHT: The back of the repair often tells you more than the front. Paint shows presentation. Metal, seams, structure and documentation show what you are really buying.
If you are considering a classic overseas and want help understanding rust, previous repairs, bodywork quality or what should be inspected before you commit, contact Classics R Us by phone or WhatsApp.
IMPORTANT INFORMATION:
This Guide is intended as practical buyer education, not engineering, structural, mechanical, restoration, inspection, legal or roadworthiness advice.
Body construction and repair methods vary materially between makes, models and eras. Steel monocoque vehicles, separate-chassis vehicles, aluminium-bodied classics, fibreglass-bodied cars and mixed-material structures require different inspection and repair approaches.
Visible corrosion, paint defects, filler, welding, underseal, panel gaps and previous repairs should not be interpreted in isolation. Photographs and visual inspection can identify areas requiring investigation but cannot reliably establish hidden corrosion, remaining metal thickness, internal weld quality, structural strength or body/chassis geometry.
Buyers should use an appropriately qualified independent inspector or restoration/body specialist where corrosion, previous repairs or body structure materially affect the value or safety of the vehicle. High-value aluminium, composite, coachbuilt or structurally complex classics may require marque-specific expertise.
Paint-depth meters, magnets, borescopes and other inspection tools have limitations and should be interpreted by someone familiar with the relevant substrate and vehicle construction. Destructive or invasive testing should not be performed without the owner’s express permission.
Examples of structural corrosion principles in this Guide draw on recognised inspection and repair guidance used as technical reference material. They should not be interpreted as UAE regulatory requirements.
Research checked in September 2026.